The complete TajiCast guide
This is the full walkthrough, from installing TajiCast to running it confidently during a live service. You don't need to read it all at once; use the contents below to jump to what you need. If you're setting up for the first time, start at the top and you'll be on screen within a few minutes.
Contents
1. Install & first launch
Download, get past the Windows notice, and open the app.
2. A tour of the screen
The top bar and the panels, explained.
3. Your first service
Five steps from silence to verses on screen.
4. Speech recognition
Deepgram (easiest), or offline Whisper.
5. Auto vs Manual
Hands-off, or you decide what goes live.
6. Showing verses (outputs)
Preview and Send To Live, projector, NDI, two outputs at once, and splitting long verses.
7. Finding verses yourself
Search, quick navigation, the queue, history, and highlighting phrases on screen.
8. Voice commands
Switch translations and navigate hands-free.
9. Running it from your phone
Pair a phone or tablet and drive the screen from anywhere in the room.
10. Working with themes
Starter looks and the theme designer.
11. Bible translations
Switch, import, rename.
12. After the sermon
Transcripts, sermon notes, Content Studio.
13. Settings reference
What each settings section does.
1. Install & first launch
TajiCast runs on Windows 10 and 11 (64-bit). Installing takes a minute:
- Download the installer, click Download for Windows and run TajiCast-Setup.exe.
- Get past the Windows notice, Windows may show a blue "Windows protected your PC" screen because the installer isn't code-signed yet. Click More info → Run anyway. It's expected and safe.
- Follow the installer and launch TajiCast when it finishes.
- Take the quick tour, on first launch, a guided walkthrough points out each part of the screen. You can replay it any time from Settings → Help.
2. A tour of the screen
The main screen, the dashboard, is where you run a service. It has a top bar and a set of panels.
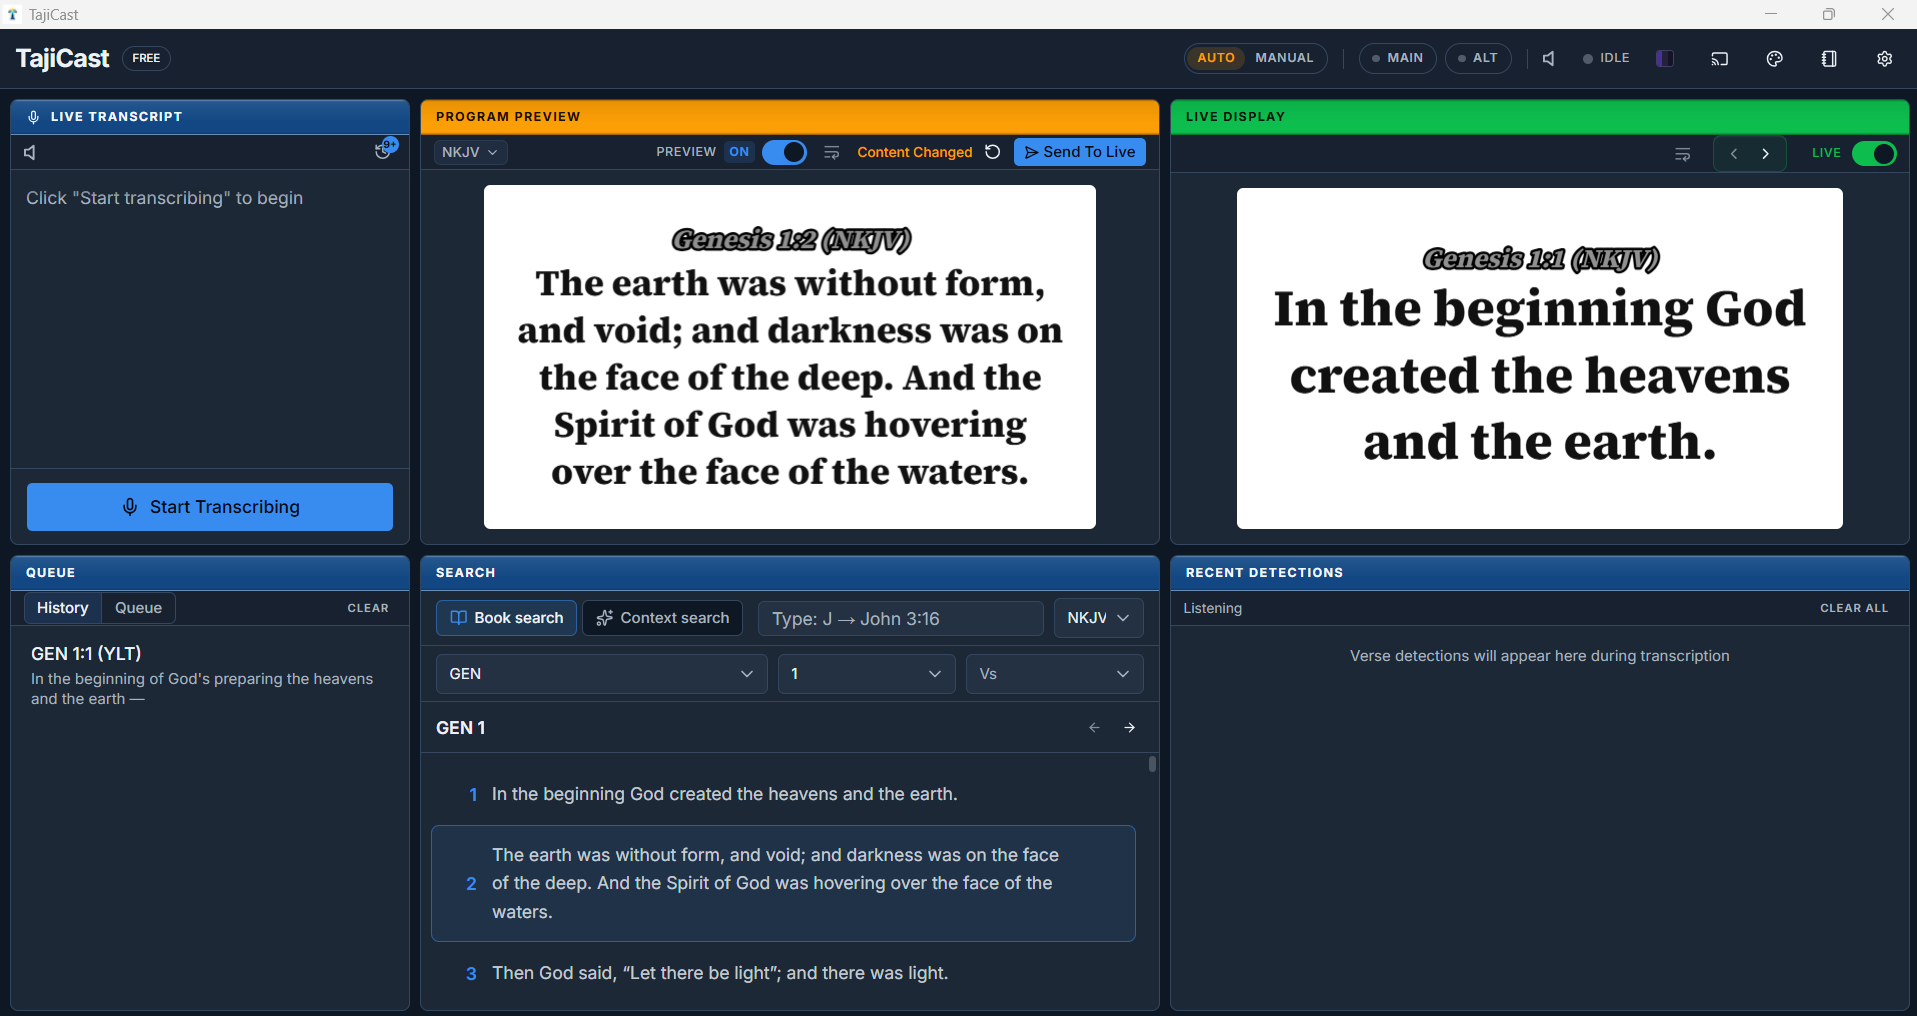
The top bar
- Auto / Manual, flip between hands-off and hands-on operation (explained in section 5).
- Main / Alt, your two output "pills." Click to turn an output on or off; right-click for quick options like choosing a monitor.
- Audio level meter, moves when TajiCast is hearing sound. A quick way to confirm your input is working.
- LIVE indicator, lights up while transcription is running.
- Icons on the right, light/dark toggle, Broadcast settings, Theme Designer, Content Studio (your transcripts and notes), and Settings.
The panels
- Live Transcript (top-left), the speech turned into text as it's spoken, with detected verses highlighted. This is where you press Start Transcribing, and where the clock icon opens your Transcript History.
- Programme Preview (top-middle), your own screen. With Preview switched on, a verse you pick waits here until you press Send To Live, so you can read it, compare a translation and mark a phrase before anyone else sees it. Switched off, verses go straight out.
- Live Display (top-right), what's actually on air. The LIVE toggle sends verses out to your projector or stream, and the arrows step through the pages of a split verse.
- Queue (bottom-left), your running set list, with a History tab beside it for what you have already shown. Drag to reorder, click to load a verse, press Enter to send live.
- Search (bottom-middle), look up any verse by reference, by phrase/topic, or with quick keyboard navigation. This is also where you mark a phrase for emphasis.
- Recent Detections (bottom-right), verses TajiCast has heard and detected, ready for you to Present or Queue.
3. Your first service, in five steps
Here's the shortest path from a fresh install to verses on screen. Do steps 1–4 once (they're remembered), and step 5 every service.
- Choose your audio input, open Settings → Audio and pick the microphone or sound-desk feed TajiCast should listen to. A clean feed from your mixer gives the best results. Watch the level meter to confirm it's hearing sound.
- Pick a speech engine, in Settings → Speech Recognition, choose Deepgram for the easiest, most accurate setup (paste a Deepgram API key under Settings → API Keys and it runs on any PC), or Whisper for a fully offline setup on a capable computer (see section 4).
- Set up your output, in Broadcast, point an output at your projector/second screen, or set it to NDI for vMix/OBS, then turn it on (see section 6).
- Choose a mode and theme, pick Auto or Manual on the top bar, and a look from the theme picker.
- Click Start Transcribing, TajiCast begins listening. In Auto mode, detected verses appear on screen automatically; in Manual, you press Present on the ones you want.
4. Choosing speech recognition
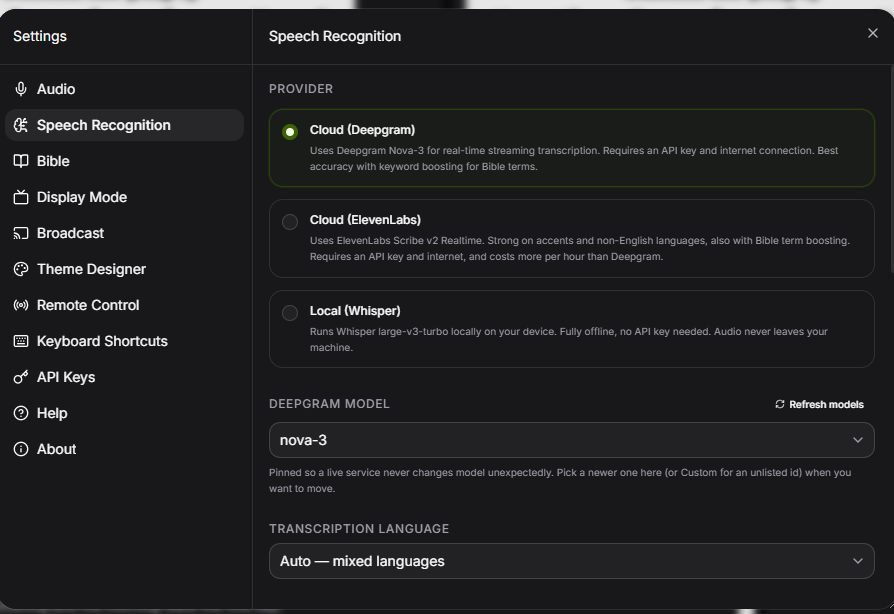
TajiCast can turn speech into text three ways. You choose in Settings → Speech Recognition, and can switch any time, even mid-service. For most churches we recommend Deepgram: it is the easiest to set up, the most accurate, and it runs well on any Windows PC, even a modest one. Deepgram gives you free starter credits generous enough to comfortably cover regular church use, so in practice transcription is free.
| Engine | Where it runs | Needs a key? | Best for |
|---|---|---|---|
| Whisper | On your computer (offline) | No | Free and fully private, but needs a fairly powerful computer |
| Deepgram (recommended) | Cloud | Yes | Easiest setup and high accuracy on any PC |
| ElevenLabs | Cloud | Yes | Strong on accents and non-English speech |
- Deepgram (cloud), recommended. The simplest way to get accurate transcription: create a Deepgram API key, add it under Settings → API Keys, then choose Deepgram in Speech Recognition. It does the work in the cloud, so it stays fast and accurate even on a basic laptop; it just needs an internet connection. Deepgram's free starter credits comfortably cover normal church transcription, so for typical use it costs nothing. For cloud engines you can also set the transcription language, or leave it on Auto if you move between languages.
- Whisper (local), for fully offline use. Runs entirely on your machine, so audio never leaves your computer and there is no per-use cost; the first time, you download a one-off offline model. Choose this if you need to work offline or keep audio private, but it leans on your computer's CPU or GPU, so it can be slow or struggle on older or low-powered machines. ElevenLabs is a second cloud option, also keyed under Settings → API Keys, and strong on accents and non-English speech.
5. Auto vs Manual mode
This single choice decides how much TajiCast does on its own. Switch between them any time on the top bar.
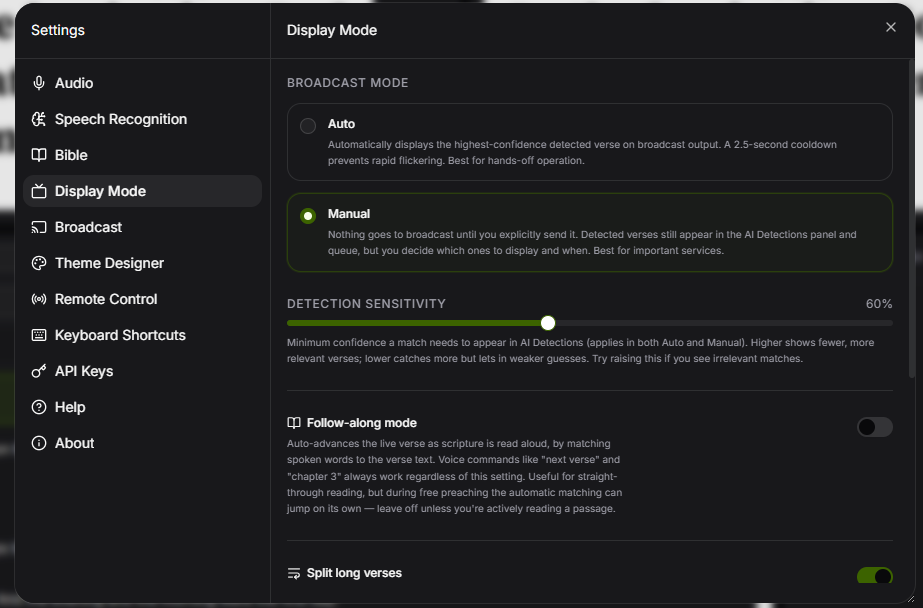
- Auto, the best-matching detected verse goes to your output automatically, with a short cooldown so the screen doesn't flicker between rapid matches. Great for hands-off operation or a solo operator.
- Manual, nothing goes on air until you send it. Detected verses still appear in the Recent Detections panel and the queue, but you decide which to display and when. Best for important services where you want full control.
Preview is a separate control, and it does not hold Auto back. In Auto mode, detected verses still go on air by themselves whether Preview is on or off. Preview is for the verses you choose, see Preview before it goes live.
Two related controls live in Settings → Display Mode:
- Detection Sensitivity, how confident a match must be to appear in Recent Detections at all (applies in both modes). Raise it if you're seeing irrelevant matches; lower it to catch more.
- Confidence Threshold (Auto only), how confident a verse must be before it's shown on air automatically. Higher means fewer false positives.
6. Showing verses, outputs
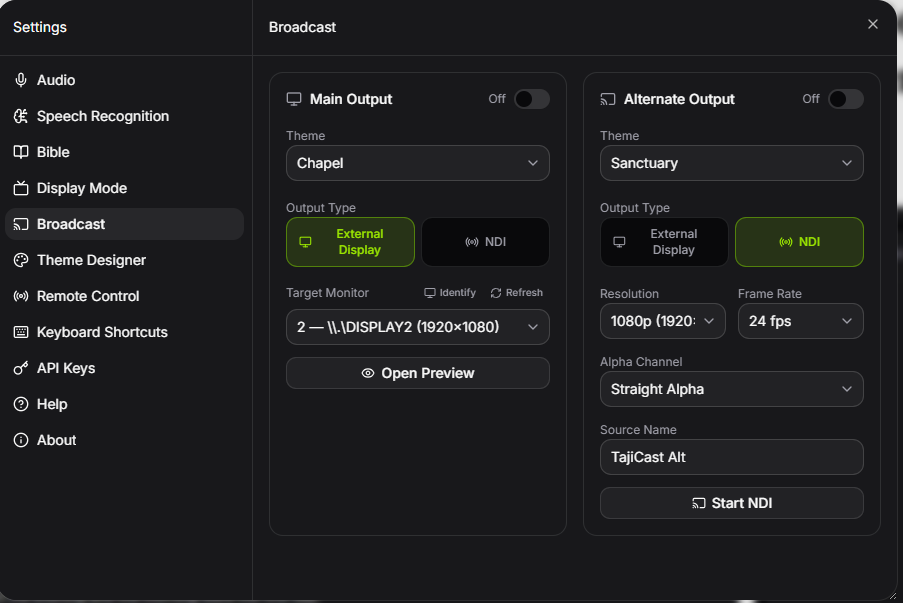
TajiCast has two independent outputs, called Main and Alt. Each can be one of two types, and each can use its own theme, so you can, for example, send a full-screen verse to the projector and a lower-third to your live stream at the same time. You configure them in Broadcast (the cast icon), and turn them on/off from the Main/Alt pills on the top bar.
Preview before it goes live
Between you and the congregation there is a holding place. The Programme Preview panel carries a Preview switch:
- Preview ON, a verse you select waits in preview. Read it, change its translation, mark a phrase, and when you are happy press Send To Live. Nothing reaches the screen until you do.
- Preview OFF, a verse you select goes straight to the live output.
Preview keeps its own translation picker, so you can see how another translation words the same verse without the congregation watching you decide. Send To Live sends the one you settled on.
If a staged verse no longer matches what is on air, preview marks it Content Changed, and the arrow beside it puts back what is live.
External Display (projector or second screen)
- Choose the target monitor, your projector or second screen. Use Identify to flash a number on each screen so you pick the right one.
- Turn the output on, and the verse fills that screen for your congregation.
NDI (for vMix, OBS and switchers)
- Set the output type to NDI to send a broadcast-ready graphic over your network, no capture card needed. See the dedicated vMix and OBS setup pages.
- Pick the resolution (720p, 1080p or 4K), frame rate (24/30/60), alpha channel (use Straight Alpha for a transparent lower-third over video), and a source name your switcher will see.
Splitting long verses
Some verses are simply too long to show at a readable size on one screen. Rather than shrinking the whole verse until it's hard to read, TajiCast can break it into clean, readable pages you step through. Turn this on in Settings → Display Mode → Split long verses. The same controls sit on the Live Display panel, so you can set lines per page and step through the pages with the arrows while a verse is on air.
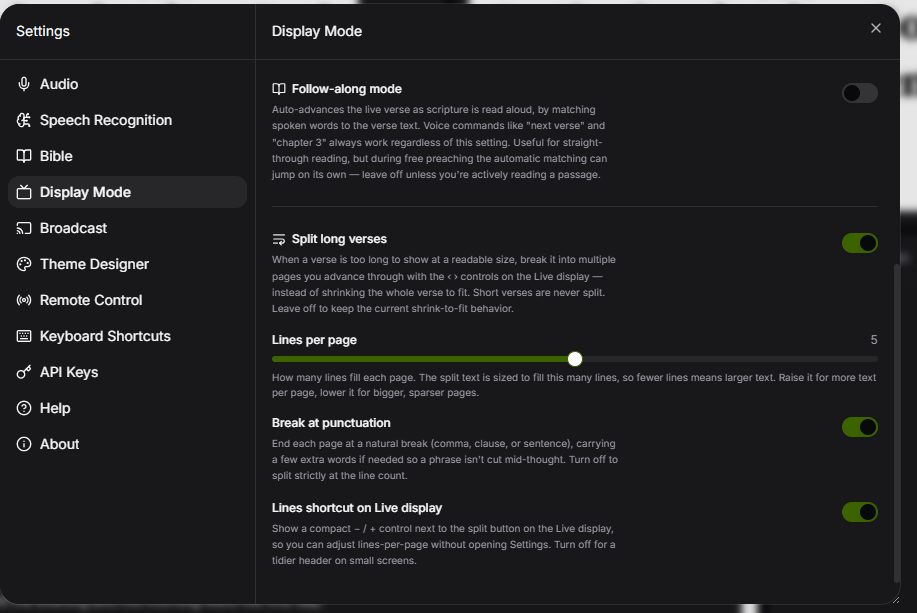
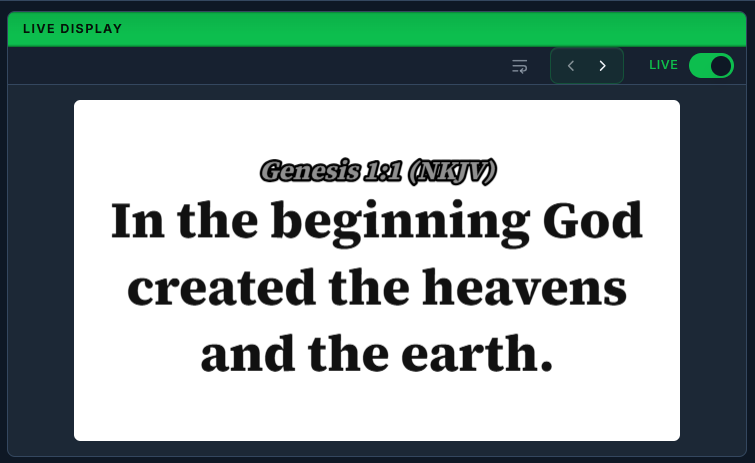
- Page through it, the Live display shows ‹ › controls to move between pages of the verse. Short verses are never split, so this only kicks in when it's actually needed.
- Lines per page, set how much text fills each page (2–8 lines). Fewer lines means larger, sparser text; more lines fits more per page.
- Break at punctuation, end each page at a natural pause (a comma, clause or sentence) so a phrase isn't cut mid-thought. Turn this off to split strictly by the line count.
7. Finding verses yourself
Detection handles most verses, but you'll often want to pull one up on purpose, a reading, a call-back, a verse the preacher references without quoting. That's what the Search panel and the Queue are for.
- Book Search, pick the book, chapter and verse directly, and switch translation from the dropdown.
- Context Search, type a phrase or idea like "walk on water" or "fearfully and wonderfully" and TajiCast finds the matching verses.
- Quick Navigation, the fastest keyboard route: type a letter (J → Joshua, Job, John…), press Tab to lock the book, then type the chapter and verse. Enter drops it into the queue; Shift+Enter sends it straight to the live display.
The queue and history
The queue is your set list. Verses arrive from detection, search, or your own entry. You can:
- Drag to reorder, the top item is next up.
- Click to load a verse into the preview, then send it live when ready.
- Right-click a verse for actions like removing it or jumping to a cross-reference, a related passage, handy when the preacher pivots from one verse to another.
- History keeps what you have already shown. Clicking an entry brings back that verse and the translation you showed it in.
Duplicate detections are handled for you, if the same verse is heard twice in quick succession, the queue flags the existing entry instead of adding a copy.
Highlighting words on screen
Sometimes a phrase deserves emphasis, the words the whole sermon turns on. In the verse text (in the Search panel), drag-select the words you want and confirm the prompt that appears. They light up with a marker highlight, so the congregation's eye goes straight to them.
- Once a phrase is marked, the prompt becomes Remove Highlight in the same spot, so taking it off is right where you left off.
- You can mark more than one phrase in the same verse.
- Right-click a verse for Highlight and Remove Highlight as well.
- A mark shows on screen when that verse is the one on air. Mark it in preview first and it goes out with the verse when you press Send To Live.
- Press Esc to clear the highlight, and it clears on its own when you move to a different verse.
- You can set the marker colour and the highlighted-text colour to match your look in the Theme Designer.
8. Voice commands
TajiCast listens for a small set of spoken commands so the person preaching, or the operator, can steer things without breaking flow. There's no wake word; the commands are recognised inside the normal transcript.
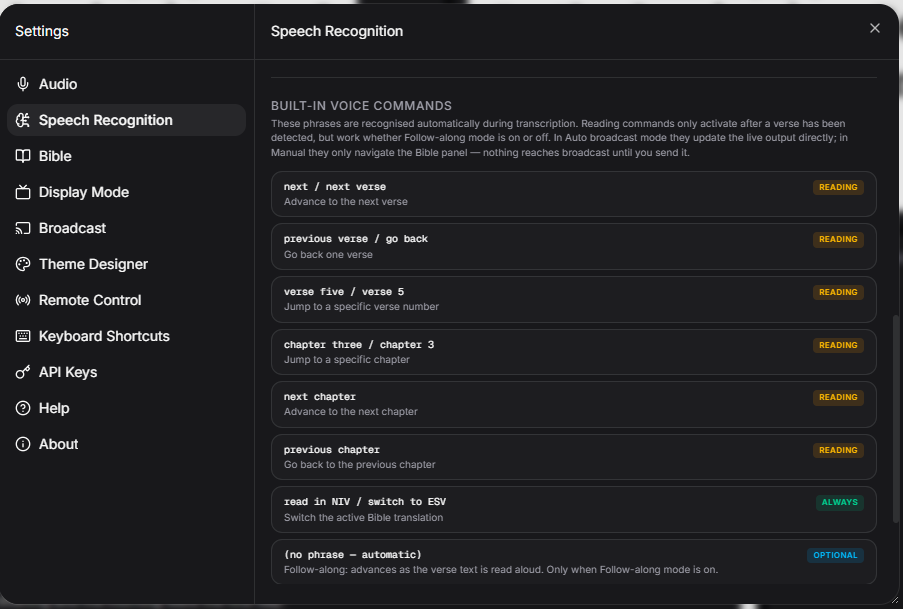
- Switch translation, say "read in NIV" or "switch to ESV" (any built-in translation) and the active translation changes on the spot.
- Move through a passage (after a verse is showing), "next" / "next verse", "previous verse" / "go back", "verse five", "chapter three", "next chapter", "previous chapter".
- Follow-along mode (optional), when turned on in Settings → Display Mode, the live verse auto-advances as the passage is read aloud. It's ideal for reading straight through a chapter, but during free preaching it can jump on its own, so leave it off unless you're actively reading.
9. Running the screen from your phone
Any phone or tablet on the same wifi can drive the live screen. It is meant for the moments when you are not sitting at the computer: reading from the lectern, running the screen on your own from the back row, or handing control to whoever is leading the next part of the service.
Connecting a phone
- Turn the remote on, press the phone icon on the transport bar at the top of the window and switch Phone remote on. (The same switch lives in Settings → Remote Control.)
- Open it on the phone, point the phone's camera at the code in the panel. If scanning will not work, type the address shown above it into the phone's browser instead.
- Enter the six-digit code shown in the panel. It is good for five minutes; press Show a new code if it runs out before the phone is in someone's hands.
Phones stay paired for the rest of the service, so one code is normally all a Sunday needs. Connect as many as you like, and disconnect any one of them from the same panel without dropping the rest.
What the phone can do
- See what the congregation sees. The phone shows the verse that is on screen and follows along as it changes, whoever moved it.
- Move through the passage, Previous and Next, or a swipe across the verse.
- Find any verse, tap Find a verse to pick a book, type a chapter and verse, choose a translation, and put it on screen.
- Clear the screen, hold the clear key to take the verse off without closing the output, and hold it again to bring the verse back.
- Open and close the output, Start the screen when nothing is showing, and a held close key to shut it down at the end.
Things worth knowing
- Same network only. The phone and the computer must be on the same wifi. Mobile data will not reach it, and guest networks that stop devices seeing each other will block it too.
- Windows may ask. Allow TajiCast through Windows Security → Firewall → Allow an app the first time, or the phone will not find it.
- A phone left untouched for two hours is dropped and needs a fresh code, so a device left in a drawer cannot drive the screen next week.
- Turning the remote off disconnects every phone at once, and TajiCast asks first when there is anyone to disconnect.
- If the remote will not start, another program is probably using its port. Change it under Settings → Remote Control → Advanced.
10. Working with themes
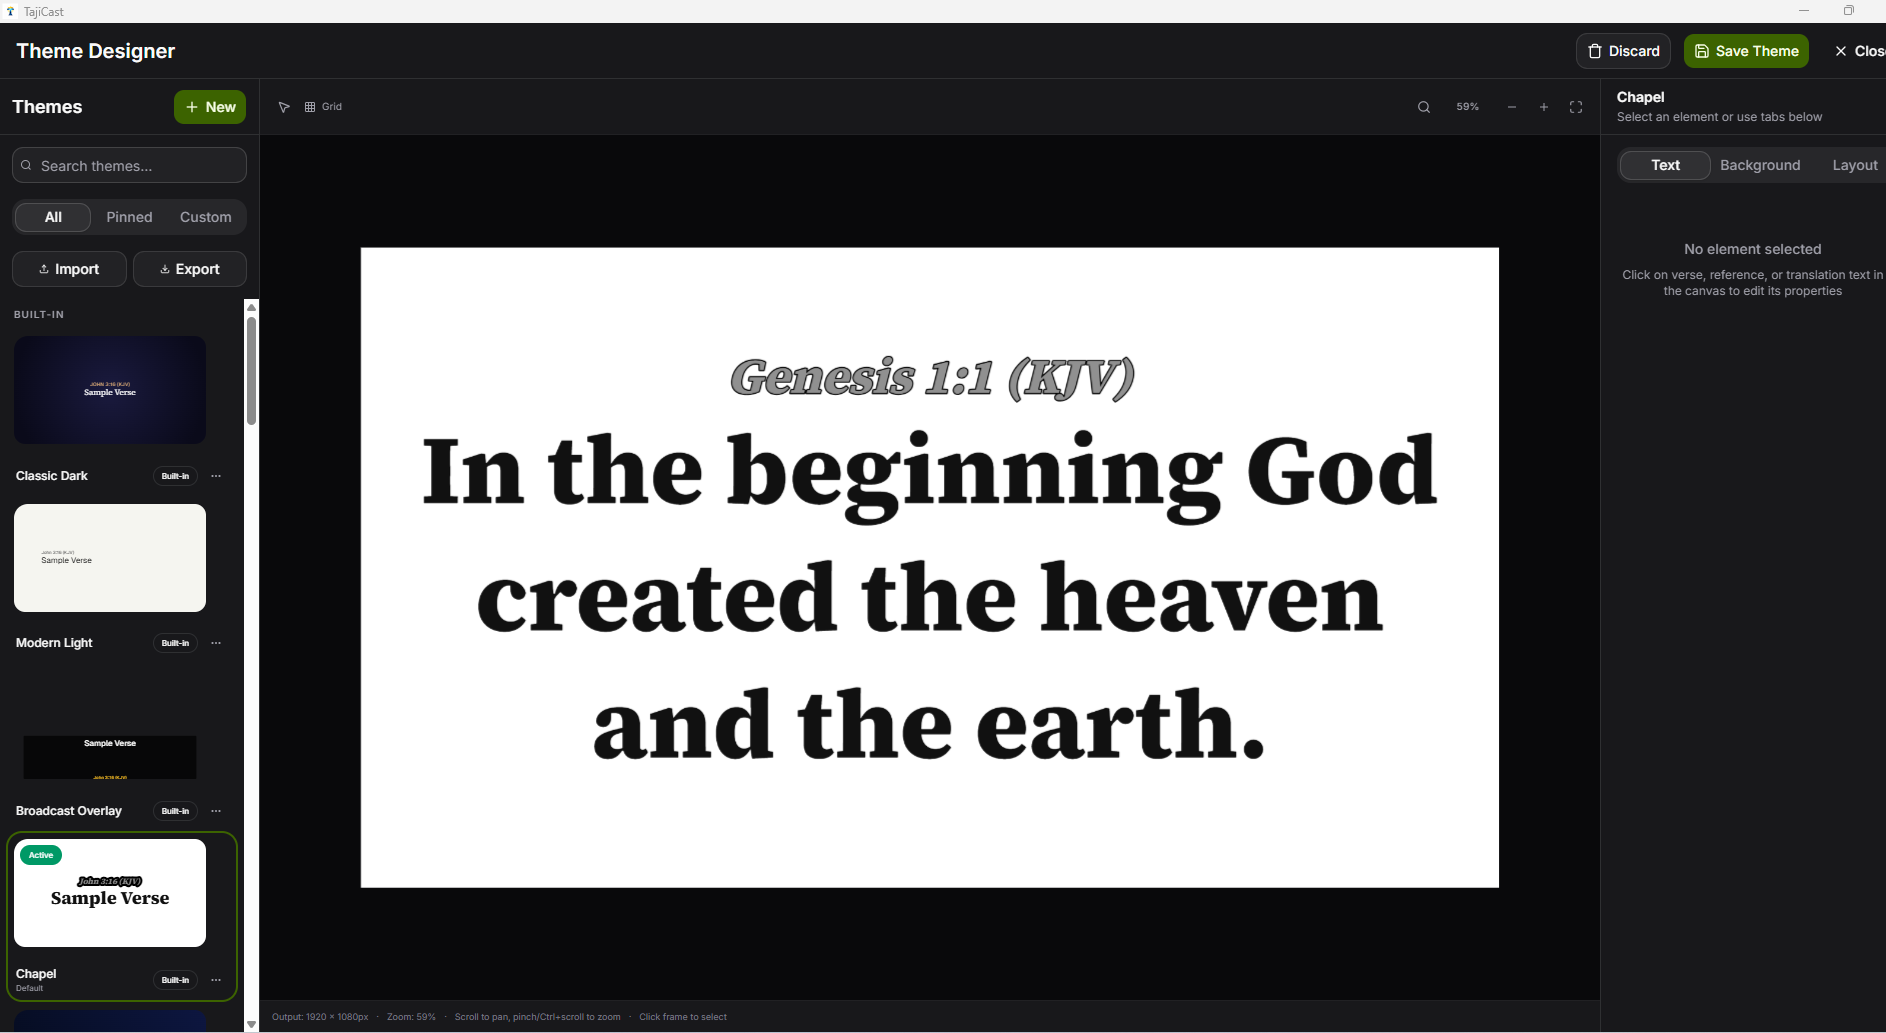
A theme is the look of your verse on screen, the fonts, colours, background and layout. TajiCast ships with ready-made starter themes for both full-screen displays and lower-thirds. Pick one from the theme picker to use as-is, or open the Theme Designer (the palette icon, or Settings → Theme Designer) to make it your own.
What you can control
The designer works like a graphic editor: a canvas at your exact output size, with each part of the verse as its own element you can style and position.
- The elements, the verse text, the reference, the translation tag and the verse number are each separate, so you can style and place them independently.
- Backgrounds, a solid colour, a gradient, an image, or fully transparent (ideal for a lower-third that sits over your camera feed).
- Typography, choose a font, size, weight, letter-spacing, line-height and alignment.
- Effects, drop shadows and outlines to keep text readable over any background.
- Highlight colours, set the marker colour and the highlighted-text colour used when you highlight words in a verse.
- Layout, drag elements into position; what you see on the canvas is exactly what goes out.
Using themes day to day
- Start from a starter, duplicate a built-in theme and tweak it rather than building from scratch.
- A different look per output, assign one theme to your Main output and another to Alt, so (for example) your projector and your live-stream lower-third each look right.
- Preview before it's live, the Programme Preview shows the active theme before you send it on air.
- Your themes are saved automatically and stay put across restarts.
For a designer's-eye view of what reads well on a stream, see our lower-third design tips.
11. Bible translations
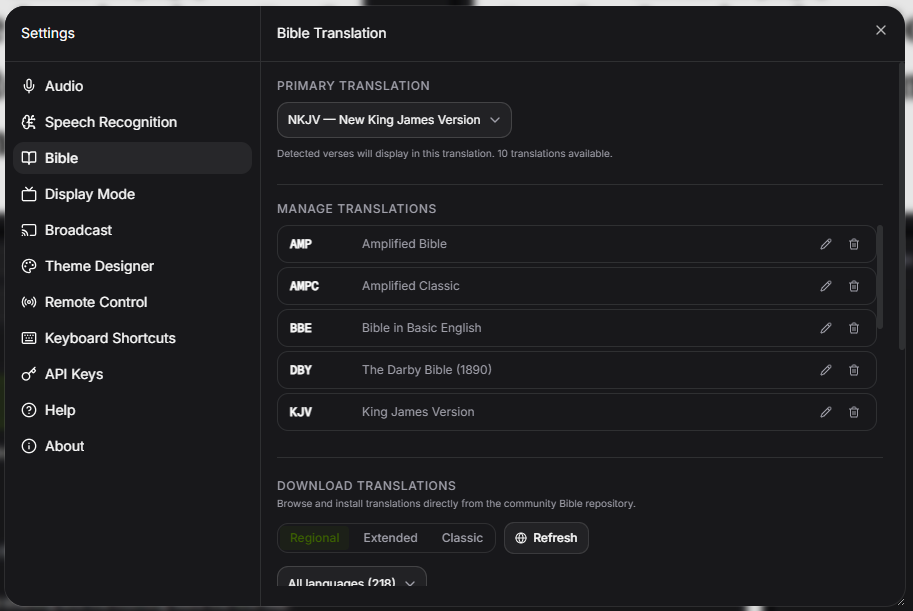
TajiCast includes ten translations across four languages, ready to use offline: KJV, NIV, ESV, NASB, NKJV, NLT and the Amplified Bible (English), Reina-Valera (Spanish), Darby (French) and Almeida Livre (Portuguese). You are not limited to these, add as many more as you like from the built-in community repository.
- Switch translation from the picker, by voice ("read in NIV"), or remotely.
- Manage translations in Settings → Bible, import additional ones, rename them, or remove those you don't use. Built-in translations are labelled so you always know which they are.
- Add as many as you need, the built-in community Bible repository in the same screen lets you browse by language and download more. There is no limit, so build up whatever set your church actually reads from.
- Compare privately, the Programme Preview panel has its own translation picker, so you can see how another translation words a verse before you send it, see Preview before it goes live.
- If a translation does not carry a verse, TajiCast tells you plainly rather than putting an empty screen on air.
Not sure which to put on screen? Our guide to the best Bible translations to display covers readability and licensing.
12. After the sermon, transcripts & notes
TajiCast does more than the live moment. Because it's transcribing the whole service, every session is saved automatically, and that opens up a lot.
- Transcript History, the clock icon on the Live Transcript panel opens your saved sessions, each with its date and length. Read, search and reuse them.
- Sermon notes, turn any transcript into a structured set of notes (title, key points, scripture references, quotes and applications). This uses an AI provider you set in Settings → API Keys → Sermon Notes AI, OpenAI, Claude, Gemini or Groq with your own key, or Ollama to run it locally with no key. It only ever uses what was actually said.
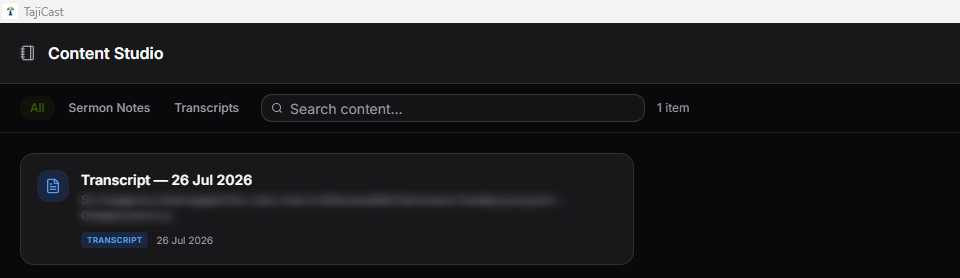
- Content Studio, the notebook icon in the top bar. A library to organise, edit, search and export your transcripts and notes, and even combine several sessions into one set of notes.
To get the most from this, see how to take sermon notes, how to transcribe a sermon, and how to turn one sermon into a week of content.
13. Settings reference
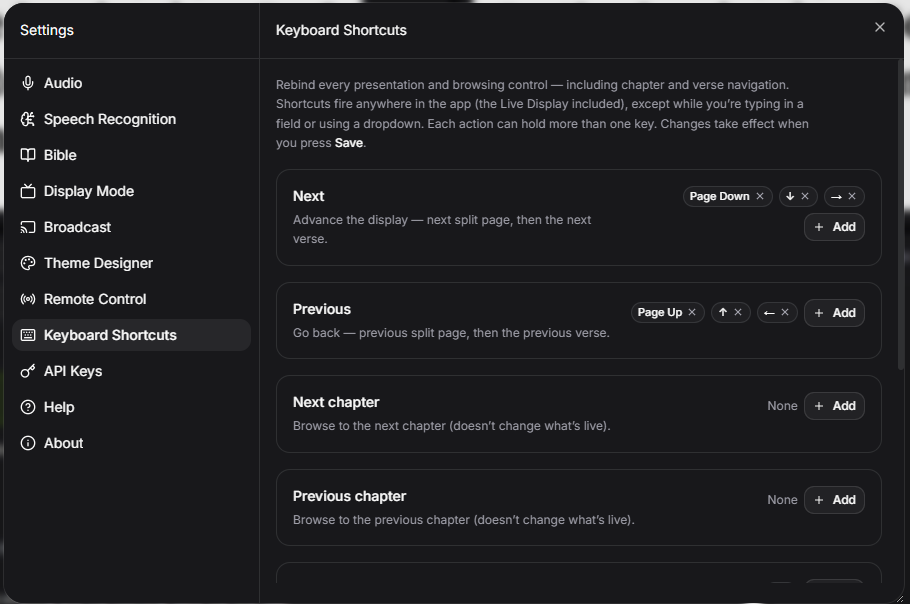
Everything lives behind the gear icon. A quick map of each section:
| Section | What it's for |
|---|---|
| Audio | Choose the input device and adjust input gain. |
| Speech Recognition | Pick Whisper / Deepgram / ElevenLabs, model and language, manage the offline model, and see the voice-command list. |
| Bible | Switch, import, rename or remove translations. |
| Display Mode | Auto vs Manual, detection sensitivity, confidence, Follow-along, and split-long-verses. |
| Broadcast | Set up the Main and Alt outputs, display or NDI, monitor, resolution and source name. |
| Theme Designer | Build and edit your on-screen verse themes. |
| Remote Control | Turn the phone remote on or off. Advanced holds the ports and the OSC listener for control from other tools, like a Stream Deck. |
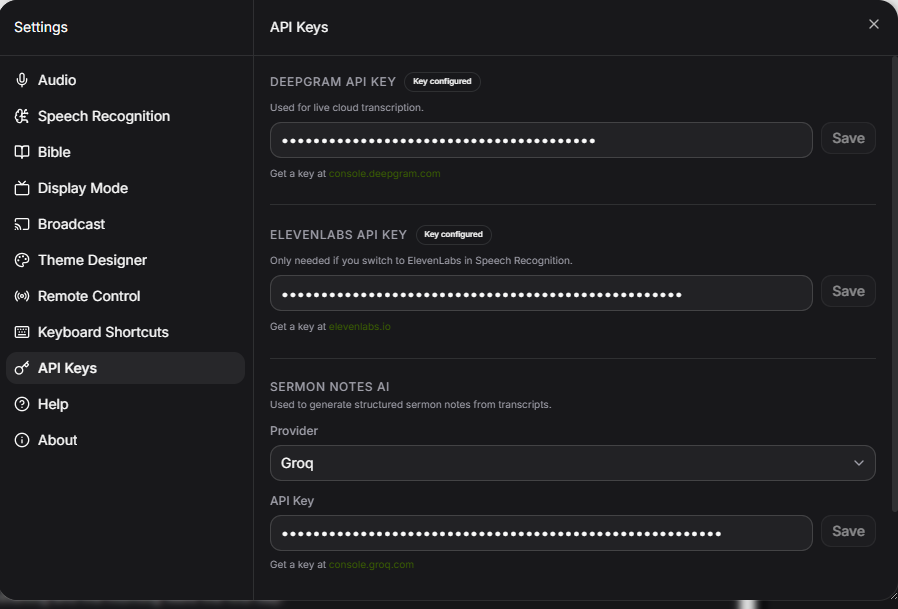
| API Keys | Add keys for cloud speech (Deepgram, ElevenLabs) and for Sermon Notes AI. |
| Help | Replay the guided tour. |
| About | Version information. |
Tips & troubleshooting
Why does Windows warn me when I install TajiCast?
The installer isn't code-signed yet, so Windows SmartScreen shows an "unknown publisher" notice. Click More info → Run anyway. It's expected and safe.
My phone will not connect to TajiCast.
Check the phone is on the same wifi as the computer, not mobile data and not a guest network, since many guest networks stop devices from seeing each other. If it is, allow TajiCast through Windows Security → Firewall → Allow an app. A code only lasts five minutes, so press Show a new code if the panel has been open a while.
Nothing is being detected, what should I check?
First confirm TajiCast is hearing audio: the level meter in the top bar should move when there's sound, and the transcript should fill in after you click Start Transcribing. If it's silent, choose the correct input in Settings → Audio. If the transcript works but few verses appear, lower the Detection Sensitivity in Settings → Display Mode.
The wrong verses jump up during free preaching.
That's usually Follow-along mode matching spoken words to verse text. Turn it off in Settings → Display Mode unless you're reading straight through a passage. In important services, Manual mode gives you full control over what goes on air.
Can I run TajiCast completely offline?
Yes. Choose Whisper in Settings → Speech Recognition and it transcribes on your computer with no internet or key. Verse detection and display are already offline. For offline sermon notes, use the local Ollama option.
How do I show verses on a projector and my live stream at once?
Use the two outputs: set Main to External Display for the projector and Alt to NDI for vMix or OBS (or vice-versa), each with its own theme, and turn both on.
Ready to try it? It's free.
Download TajiCast for WindowsMore help: How to display Bible verses during a sermon · TajiCast for vMix · TajiCast for OBS · the blog